
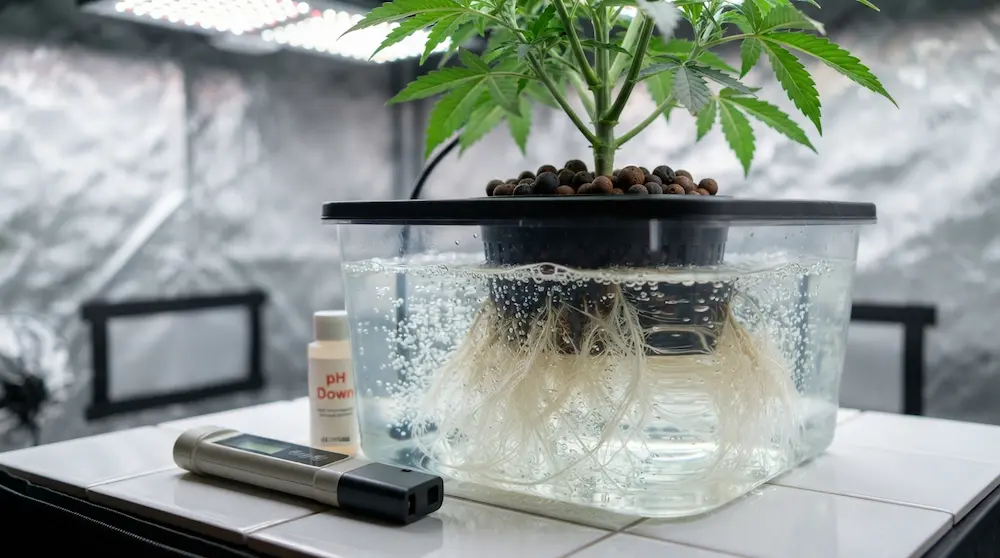

Growing Weed Hydroponically: A Practical Blueprint for Soilless Cultivation
Stepping into the world of weed hydroponics is akin to unlocking fast-forward mode for your indoor cultivation journey. While traditional soil growing relies on the slow, natural breakdown of organic matter, microbial life cycles, and unpredictable sub-surface drainage, learning how to grow hydroponic cannabis is defined by direct, unmediated precision. By suspending plant roots directly in an oxygenated, nutrient-rich water solution, your crops bypass the energy-intensive underground search for food. The result is accelerated vegetative growth, massive branching root systems, and harvest yields that routinely outpace soil-grown counterparts by staggering margins.
However, this high-performance environment is inherently a double-edged sword. Because there is no natural soil buffer to catch mistakes, understanding how to grow weed hydroponically requires meticulous attention to detail, rigorous parameter tracking, and a deep comprehension of advanced plant biology. Without dirt to forgive temporary imbalances, a minor swing in your reservoir chemistry can transform into a full-scale crisis within hours. This comprehensive guide will walk you through every single facet of designing, executing, and mastering a high-yield hydroponic cannabis garden from seed to final cure, ensuring you have the technical foundation required to succeed.
The Core Philosophy and Mechanics of Soilless Cultivation
To truly understand why hydroponics produces such staggering vegetative results, you first need to examine how a cannabis plant naturally feeds and develops. In nature, roots forage haphazardly through dirt to find pockets of moisture, oxygen, and elemental minerals. This process requires a tremendous amount of metabolic energy; the plant must grow a massive web of fine feeder roots simply to push through physical resistance and scour the earth for scarce resources.
In a properly maintained hydroponic setup, water, dissolved oxygen, and ionic mineral nutrients are delivered directly to the root zone twenty-four hours a day, seven days a week. Without the physical weight, density, and compaction resistance of soil, the plant diverts the energy it would normally spend building an extensive underground root network into explosive upward vegetation and heavy floral development.
Yet, this high-efficiency pipeline means that any fluctuation in water temperature, pH balance, or nutrient concentration hits the plant instantly. Precision replaces guesswork entirely, and small errors can quickly compound into major structural or nutritional issues if left unchecked by the grower.
Choosing Your Hydroponic System Architecture
Before purchasing any expensive hardware, you must select the system architecture that best fits your physical space, financial budget, and personal experience level. While there are many variations and custom hybrid designs on the market, four primary configurations dominate indoor cannabis cultivation:
Deep Water Culture (DWC)
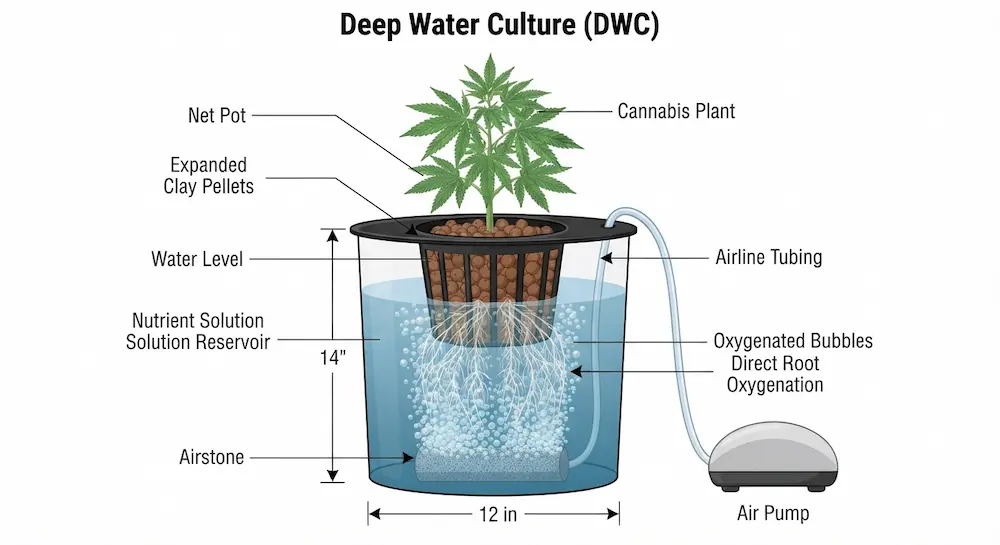
Deep Water Culture is widely considered the quintessential gateway into hydroponics. Plants are held securely in net pots filled with inert medium, suspended directly over a reservoir filled with a water-and-nutrient solution. An aquarium air pump connected to an airstone continuously pumps millions of micro-bubbles into the water, keeping the root zone saturated with dissolved oxygen. DWC is inexpensive, highly effective, easy to build as a do-it-yourself project, and capable of generating exceptionally fast growth rates. However, if one reservoir fails or contracts root rot, it directly impacts the specific plants tied to that exact basin, and water temperatures must be watched closely.
Nutrient Film Technique (NFT)
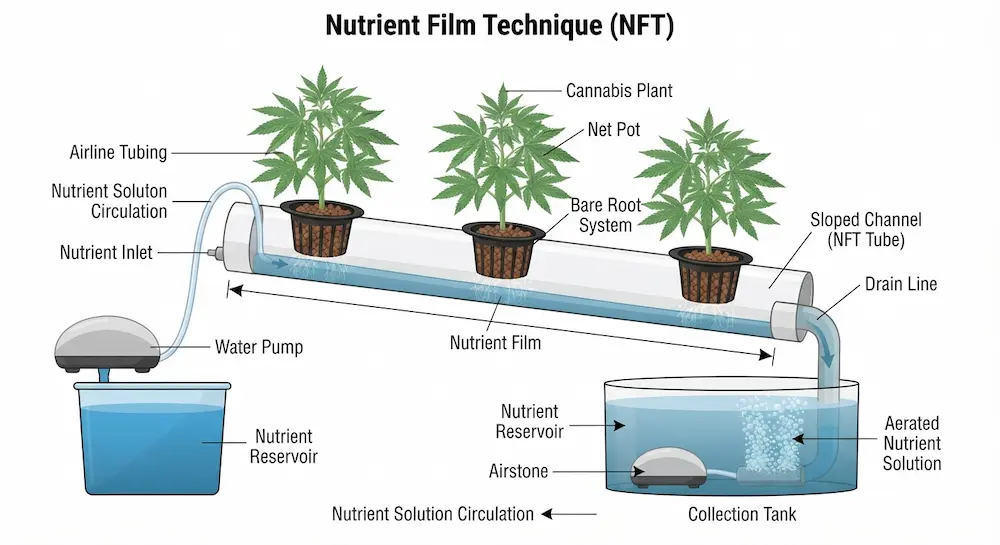
In a Nutrient Film Technique system, a continuous, shallow stream of nutrient-rich water flows constantly across the bottom of a sloped channel or tray, bathing the tips of the bare roots while the upper root mass remains exposed to humid air. This approach is highly efficient, uses significantly less water, and eliminates the need for bulky standing reservoirs beneath every single plant. Despite these advantages, NFT systems are highly vulnerable to pump failures or electrical power outages; if the water stops flowing even briefly, exposed roots dry out and die rapidly.
Ebb and Flow (Flood and Drain)
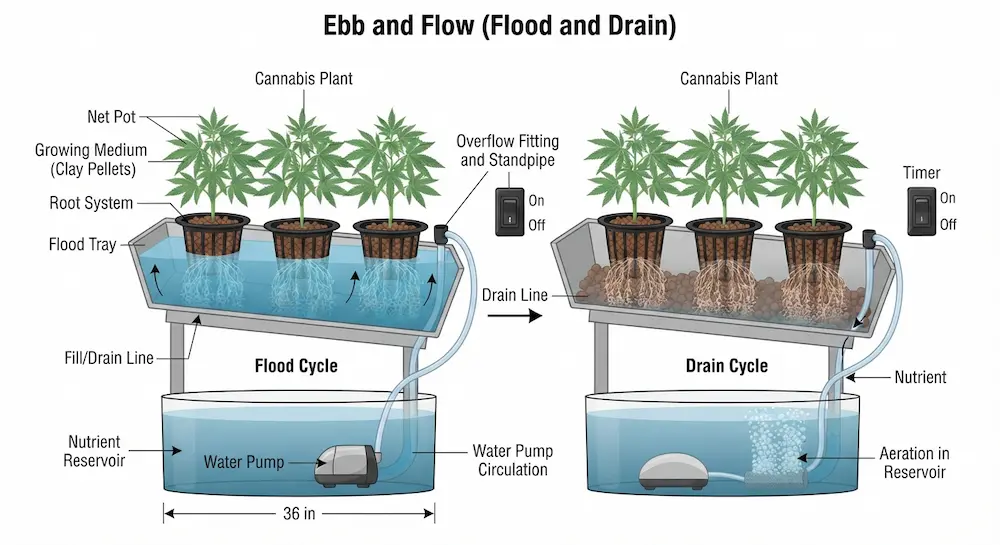
An Ebb and Flow setup utilizes a digital timer to periodically flood the plant tray with nutrient solution, completely submerging the roots for a set duration before gravity pulls the liquid back down into the primary reservoir below. This creates an exceptional cycle of root oxygenation during the drain phases, and the system is remarkably versatile with various inert growing mediums like expanded clay pebbles. The main drawback is that it relies heavily on mechanical timers and submersible water pumps, both of which can occasionally jam, stick, or fail.
Aeroponics
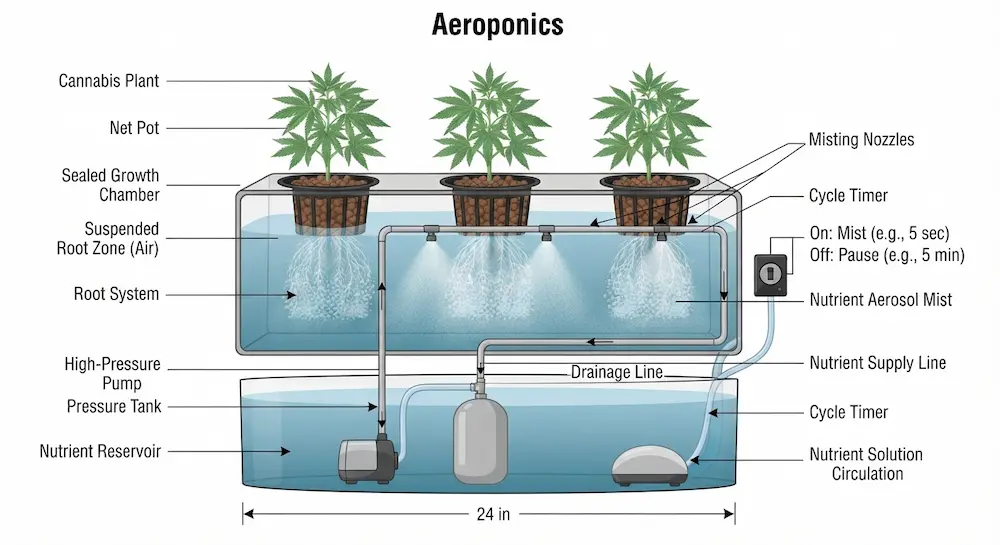
Aeroponics is the most high-tech approach available to the home grower. It suspends cannabis roots completely in mid-air inside a dark chamber, where high-pressure nozzles mist them continuously or intermittently with a fine aerosol of nutrient solution. This provides unmatched growth rates and optimal oxygen availability due to maximum root aeration. On the flip side, aeroponics is expensive, complex, and high-risk; clogged nozzles or unexpected pump failures can destroy an entire crop within hours.
Essential Equipment Checklist and Setup Optimization
Assembling a clean, reliable, and lightproof cultivation environment is non-negotiable for long-term success. Missing a single crucial component can invite algae blooms, pest infestations, or catastrophic system failure mid-grow.
Your grow space should be centered around a reflective interior grow tent lined with high-grade Mylar to maximize photon distribution across the canopy. You will need proper negative pressure established via inline exhaust fans paired with carbon filters to ensure absolute odor control and fresh air exchange. For illumination, invest in high-intensity full-spectrum LED fixtures or traditional High-Pressure Sodium systems. LEDs are heavily favored today for their superior energy efficiency, customizable spectrums, and significantly lower heat signatures, which keep your room temperatures stable without requiring heavy air conditioning units.
Your nutrient reservoir must be completely opaque. Any light leaks inside a reservoir will immediately invite algae growth and opportunistic pathogens like pythium. Aeration requires commercial-grade air pumps, heavy-duty silicone tubing, and multiple micro-pore airstones. You will also need inert growing mediums such as hydroton pellets, rockwool cubes, or coco coir, which hold no nutritional value and serve purely as physical structural support. Finally, high-precision digital pH meters and Electrical Conductivity meters are mandatory tools that act as your eyes and ears throughout the grow cycle.
Water Chemistry, pH, and Nutrient Dynamics
If you remember only one rule in hydroponics, let it be this: water chemistry dictates nutrient availability. If your pH drifts outside the optimal zone, your plants can starve to death amidst a sea of available food due to chemical nutrient lock-out.
The Magic pH Window
For hydroponic cannabis, the absolute target pH range is 5.5 to 6.5. Maintaining a pH closer to 5.5 to 5.8 during the vegetative stage optimizes the uptake of nitrogen, iron, and magnesium. Shifting toward 6.2 to 6.5 during the flowering phase ensures optimal uptake of phosphorus and potassium. Always use high-accuracy digital pH pens, calibrate them monthly, and use professional-grade pH-Up and pH-Down solutions to nudge values into alignment.
Monitoring Electrical Conductivity and PPM
Electrical conductivity measures the total concentration of dissolved mineral salts in your water. Seedlings and clones require a light feeding of 0.4 to 0.8 EC. During early vegetation, you can ramp this up to 0.8 to 1.2 EC, moving to 1.2 to 1.6 EC in late vegetation. Peak flowering plants can handle 1.6 to 2.2 EC or higher, depending entirely on the specific strain's genetic tolerance and appetite.
Advanced Climate and Environmental Controls
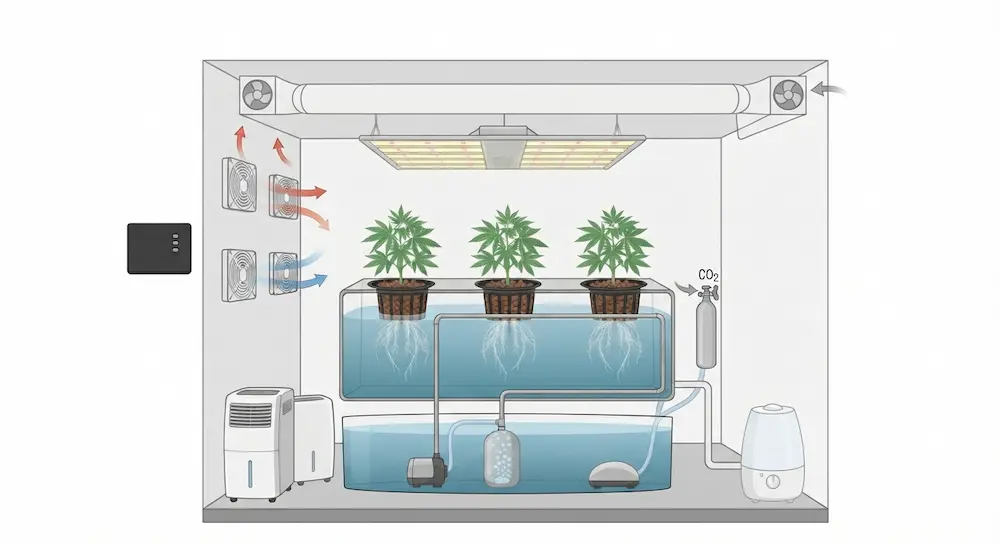
Managing your ambient climate is just as important as maintaining your water parameters. Indoor cannabis grown hydroponically transpires heavily due to the constant availability of water at the roots. Relative humidity must be carefully managed across different life stages. During the vegetative phase, keep humidity around 60 to 70 percent with a vapor pressure deficit of roughly 0.8 to 1.1 kPa. As you transition into the flowering stage, gradually drop humidity down to 40 to 50 percent to prevent moisture from trapping inside dense colas, which creates an ideal breeding ground for bud rot and powdery mildew.
Air circulation is another critical pillar. Implement oscillating wall-mount fans beneath and above the canopy to keep air moving constantly, preventing stagnant micro-climates and strengthening plant stems against heavy floral weight. Carbon dioxide supplementation can also be integrated if you are running sealed rooms with high-intensity lighting, pushing ambient levels from 400 ppm up to 1200 ppm to accelerate photosynthetic output.
Step-by-Step Cultivation Process
Step 1: Germination and Inoculation
Start your seeds using the traditional paper towel method or directly inside pre-soaked, pH-adjusted rockwool plugs. Once the taproot emerges and the initial cotyledons unfurl, place the plug directly into your net pot filled with expanded clay pellets or your chosen medium. Keep the immediate area moist until the taproot drops downward into the system environment. You will know this step was successful when fresh, white roots begin actively emerging from the bottom of the net pot into the air gap or water stream below.
Step 2: The Vegetative Phase
Once roots hit the water stream below, transition to full-strength vegetative nutrients heavy in nitrogen, calcium, and magnesium. Keep your lights on an eighteen-hour or twenty-four-hour photoperiod. Monitor your reservoir water temperature closely, keeping it strictly between 65°F and 68°F. Warm water holds significantly less dissolved oxygen, directly inviting root rot. Utilize training techniques during late vegetation to flatten the canopy and maximize light exposure. You will know this step was successful when your plant exhibits vigorous daily upward growth, thick main stems, and a lush, bright green canopy.
Step 3: The Flowering Transition
To trigger flowering in photoperiod strains, flip your lighting timer to a strict twelve hours of light and twelve hours of darkness. Transition your nutrient profile from high-nitrogen growth formulas to bloom formulas rich in phosphorus and potassium. Watch for the explosive initial vertical stretch during the first three weeks of flower, and defoliate lower interior fan leaves that block light penetration. You will know this step was successful when you observe the formation of white pistils and clusters of pre-flowers at the nodes within two weeks of the light schedule change.
Step 4: Flushing, Harvest, and Cure
Approximately one to two weeks before your targeted harvest date, perform a final reservoir flush by filling your system with plain, pH-balanced water. This forces the plant to consume stored nutrients within its tissues, dramatically improving the flavor profile of the final dried flower. Once trichomes show a milky-white matrix with a scattering of amber, chop your branches, hang them in a dark room kept at 60°F and 60% humidity for ten to fourteen days, and cure them in airtight glass jars. You will know this step was successful when harvested flowers snap cleanly at the stem rather than bending, and jar humidity stabilizes between 58% and 62%.
Advanced Pro-Tips for Hydroponic Success
Consider adding a specialized root inoculant containing beneficial microbes, such as Bacillus subtilis or mycorrhizal fungi, directly to your reservoir. These beneficial bacteria colonize the root zone, crowding out harmful pathogens and acting as a biological insurance policy against root rot.
Never disturb tiny roots during the first few weeks of life, as baby roots are glass-fragile. Avoid pulling up net pots to inspect them, because twisting or stretching delicate root hairs can stunt or kill the plant instantly.
During the first month, instead of dumping your entire reservoir weekly, simply top off evaporating water with fresh, pH-balanced water containing a fraction of nutrients, as young plants consume water faster than heavy salts. Perform complete reservoir changes every seven to ten days once plants are large and fully established.
Mastering hydroponic cannabis cultivation transforms you from a casual gardener into a true botanical scientist. By maintaining pristine water hygiene, locking down your climate parameters, and respecting the raw speed of soilless growth, you will be rewarded with top-tier yields of connoisseur-grade flowers that rival commercial production facilities.