
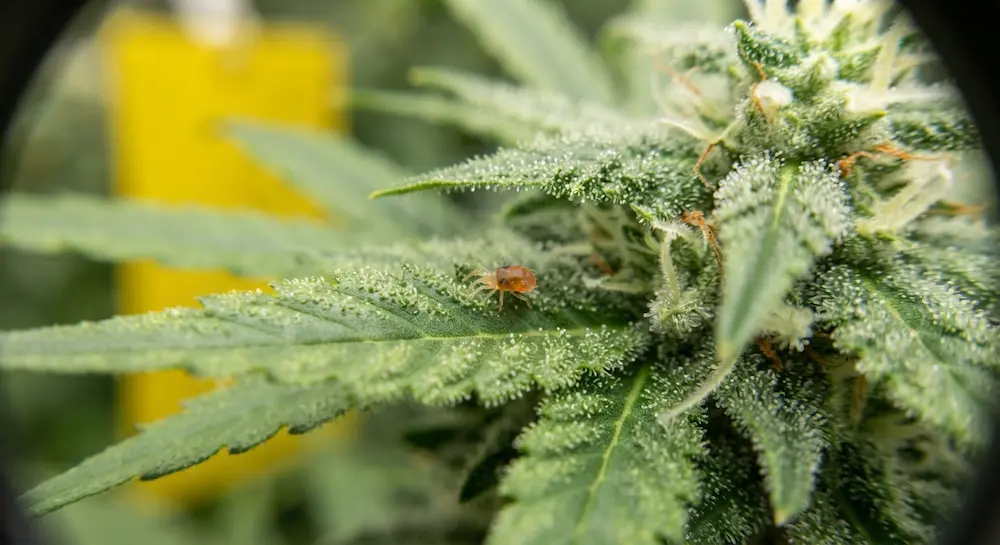

Defend Your Grow: A Practical Blueprint for Cannabis Pest Control
Few things trigger a grower's panic quite like spotting a cluster of microscopic webs under a fan leaf or finding tiny, winged insects swarming the grow medium. Whether you are cultivating a modest indoor tent or managing a sprawling outdoor greenhouse, cannabis pest control is one of the most critical elements of crop management.
Because cannabis is a high-value crop—and in many cases, an ingestible medicine—relying blindly on harsh synthetic chemical pesticides is rarely a smart or safe option. Residues can ruin your final harvest, compromise flavor, and fail compliance safety tests.
Implementing a robust, proactive framework known as Integrated Pest Management (IPM) safeguards your crop from seed to harvest without destroying your yield or the environment.
What is Integrated Pest Management (IPM)?
Integrated Pest Management is not a single product or a one-time spray; it is a holistic strategy. Instead of reacting to an infestation after it has already ravaged your plants, IPM focuses on prevention, constant observation, environmental control, and using the least toxic intervention necessary.
An effective cannabis IPM program relies on a pyramid of escalating defenses:
- Cultural Controls: Optimizing the grow room environment, sanitation, and plant vigor.
- Physical & Mechanical Controls: Using sticky traps, physical barriers, pruning, and quarantine protocols.
- Biological Controls: Introducing beneficial predatory insects and microscopic organisms to hunt down pests naturally.
- Chemical/Organic Interventions: Utilizing safe, soft contact sprays (like insecticidal soaps, horticultural oils, or citric acid solutions) as a targeted backup when natural thresholds are crossed.
The Most Common Cannabis Pests (And How to Spot Them)
To fight an enemy, you have to recognize it. Different pests target different parts of the cannabis plant and thrive under specific environmental conditions.
1. Two-Spotted Spider Mites (Tetranychus urticae)
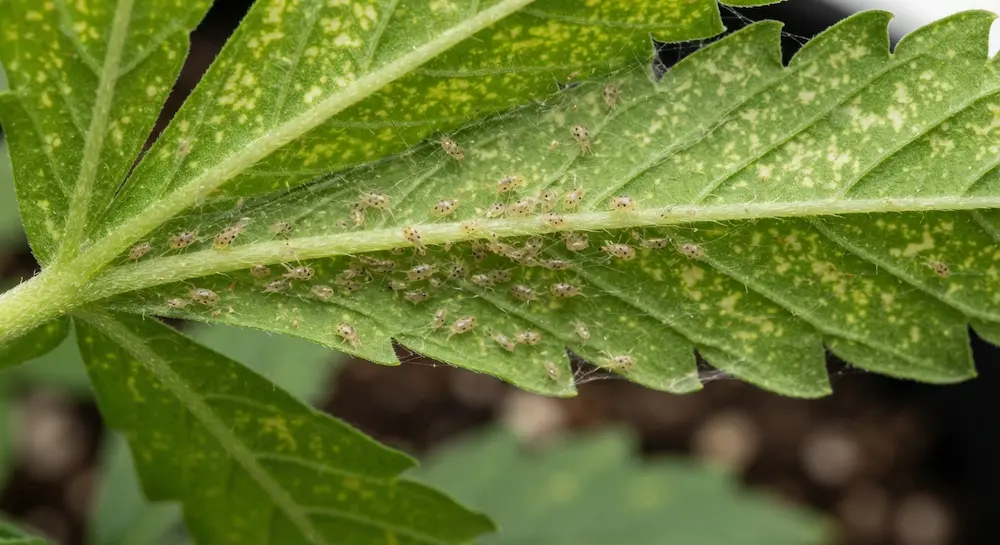
- The Threat: The absolute scourge of indoor growers. These tiny arachnids pierce plant cells to suck out chlorophyll, leaving behind a stippled, speckled pattern on upper leaf surfaces. In heavy infestations, they spin fine, silken webs across buds and colas.
- Conditions They Love: Hot, dry environments with stagnant air.
- The Tell-Tale Sign: Tiny white or yellow speckling on fan leaves, followed by fine webbing on the undersides of leaves or bud tips.
2. Fungus Gnats
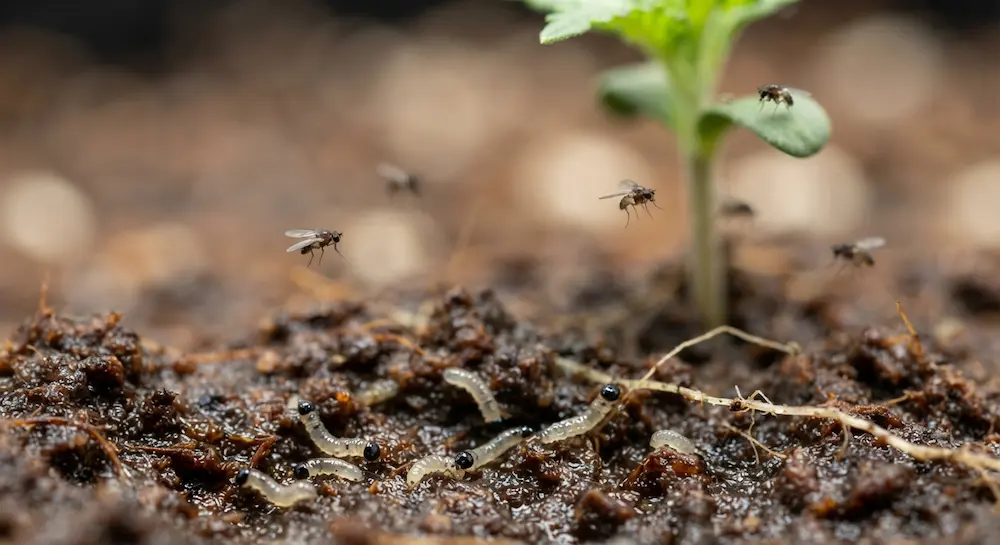
- The Threat: While adult fungus gnats are mostly harmless, annoying little flyers, their larvae live in the damp soil medium. These translucent larvae feed on organic matter, fine root hairs, and root tips, stunting young plant growth and inviting root rot pathogens like Fusarium.
- Conditions They Love: Overwatered, constantly soggy growing media and high humidity.
- The Tell-Tale Sign: Small black flies buzzing around the base of your containers and tiny white worms wriggling in the top layer of soil when watered.
3. Thrips
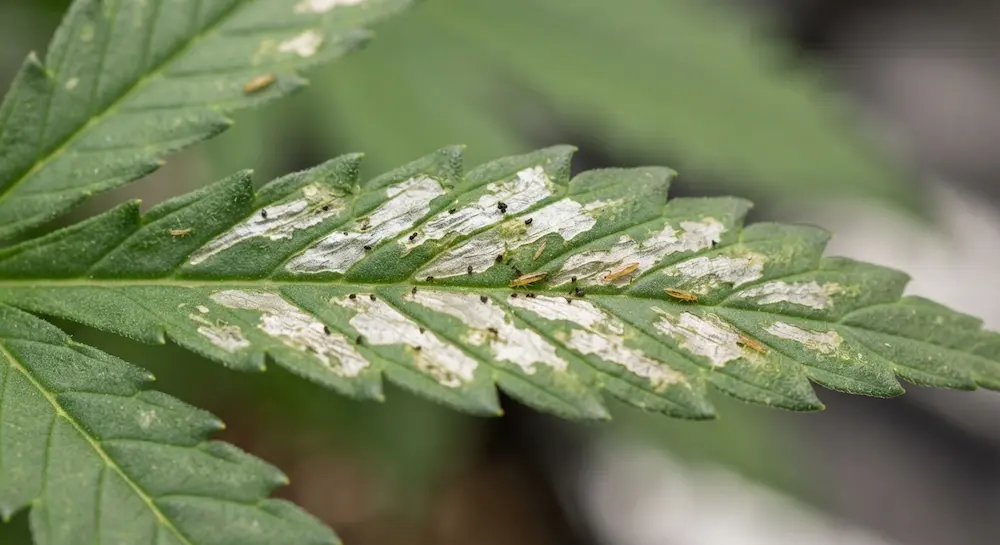
- The Threat: Slender, agile insects (yellow, brown, or black) that scrape the outer layer of cannabis leaves to feed on plant sap.
- Conditions They Love: Warm, low-humidity environments.
- The Tell-Tale Sign: Distinct silvery, translucent patches on leaves accompanied by tiny black dots of frass (insect waste).
4. Aphids (Foliage and Root Aphids)
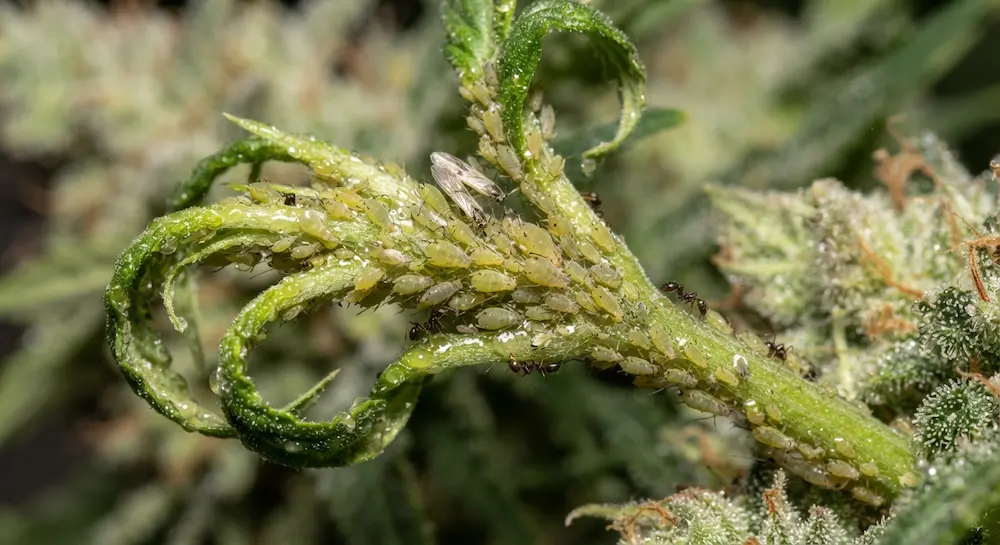
- The Threat: Pear-shaped insects that colonies heavily on leaf undersides and stems, sucking plant sap and secreting a sticky substance called "honeydew" that attracts mold. Root aphids live entirely beneath the soil, devastating the root system similarly to fungus gnats.
- Conditions They Love: Lush, over-fertilized plants with high nitrogen content.
- The Tell-Tale Sign: Curled leaves, general plant fatigue, sticky residue on lower leaves, and ants farming the aphids for their honeydew.
5. Hemp Russet Mites and Broad Mites
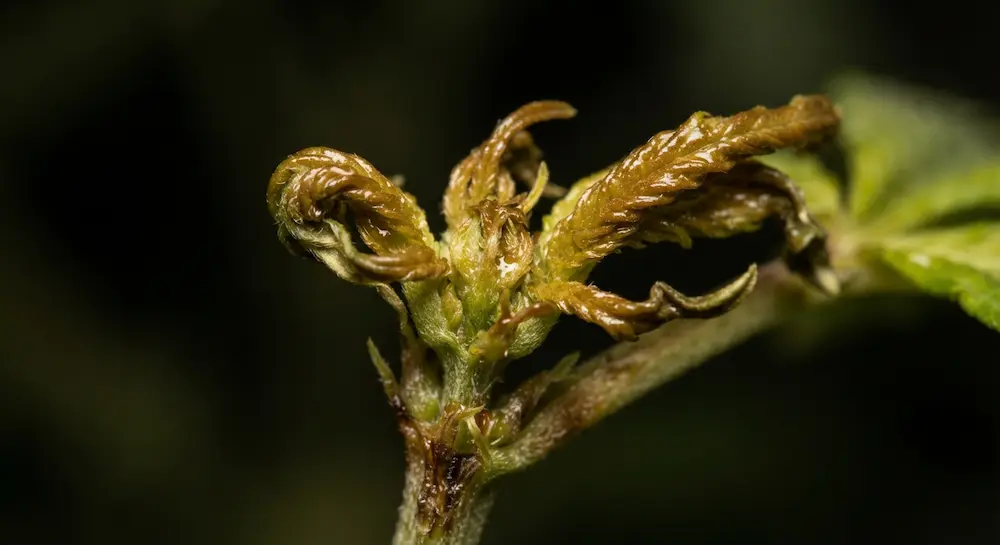
- The Threat: Microscopic mites invisible to the naked eye without a jeweler’s loupe. They distort new growth, causing leaves to curl downward, turn bronze or glossy, and eventually stall flower development entirely.
- The Tell-Tale Sign: Brittle, canoe-shaped leaves, stunted growth at the top of the plant, and a complete lack of trichome production on affected colas.
Step 1: Prevention (The Foundation of Clean Growing)
The easiest pest to manage is the one that never enters your cultivation space. Rigorous preventative protocols eliminate up to 90% of potential outbreaks before they start.
- Never Trust Incoming Clones: If you are bringing unrooted cuttings or clones from an outside source, treat them like a biohazard. Always quarantine new plant material in a separate room for at least 10 to 14 days. Inspect them meticulously with a 30x pocket microscope before integrating them into your main canopy.
- Sanitation is Law: Cleanliness stops pests from breeding. Sweep up plant debris daily, remove fallen fan leaves from the floor, and sterilize tools (pruners, trays, trellis netting) between rooms.
- Airtight Room Entry: Use sticky walk-off mats at the entrance of your grow room to catch stray debris and insects. Enforce a strict one-way workflow if possible (moving from clean vegetative rooms to dirty harvest spaces, never backward).
- Avoid Excess Nitrogen: Overfeeding plants with high-nitrogen fertilizers creates soft, lush, structurally weak cell walls that make plants an easy snack for sucking pests. Keep your nutrient regimens balanced.
Step 2: Environmental Control & Monitoring
Pests and pathogens require specific atmospheric conditions to thrive and multiply. By actively manipulating your climate, you can make your grow room deeply inhospitable to invaders.
- Master the Vapor Pressure Deficit (VPD): Keeping your temperature and relative humidity properly dialed in prevents stress on the plant and disrupts pest reproduction cycles. For instance, slightly lowering room temperatures and increasing humidity can stall spider mite explosions.
- Ensure Uniform Airflow: Dead air pockets create microclimates where pests love to breed and mold spores love to germinate. Use oscillating fans above and below the canopy to keep air moving constantly.
- Deploy Yellow and Blue Sticky Cards: Hang yellow and blue sticky cards throughout your canopy and near the base of pots. These act as an early-warning radar system. Check them weekly with a magnifying glass to identify which pests are present long before a full-blown infestation breaks out.
Step 3: Biological Warfare (Beneficial Insects)
Instead of dumping toxic chemicals onto consumable medicine, modern professional and hobbyist growers increasingly turn to biocontrols—introducing natural predators that hunt down and destroy pests while leaving your cannabis completely unharmed.
- For Spider Mites: Introduce predatory mites like Phytoseiulus persimilis (a ferocious specialist that hunts red spider mites) or Neoseiulus californicus (a hardy generalist that survives when prey numbers are low).
- For Fungus Gnats & Root Pests: Apply beneficial nematodes (Steinernema feltiae) or soil-dwelling predatory mites like Stratiolaelaps scimitus to your growing medium. The nematodes seek out and parasitize gnat larvae in the soil, wiping them out at the root level.
- For Thrips & Whiteflies: Release Amblyseius swirskii or minute pirate bugs (Orius insidiosus), which patrol leaf surfaces and consume thrips larvae and whitefly eggs.
Pro-Tip: When releasing beneficial insects, temporarily turn down your high-velocity oscillating fans for 24 hours so the beneficials have time to settle into the canopy instead of getting blown into exhaust vents.
Step 4: Safe Interventions and Knockdown Sprays
If preventative measures and beneficial insects fail to keep an aggressive outbreak under control, you may need to step in with a physical knockdown spray. When choosing a treatment, always ask: Will this leave a residue on my resin glands? Is it safe to use during early flower?
- Oil-Free, Citric-Acid Based Sprays: Many commercial and home growers favor residue-free, non-systemic botanical or citric-acid washes to crash pest populations instantly without ruining the flavor profile of sticky trichomes late in the cycle.
- Insecticidal Soaps and Horticultural Oils: Effective against soft-bodied insects like aphids and mites by suffocating them on contact. Crucial warning: Never use heavy oils late in the flowering stage, as they trap residues on your colas and can ruin the taste or invite bud rot.
- Spinosad: A naturally occurring soil bacterium derivative that targets chewing pests like thrips and caterpillars. Apply it strictly during the vegetative stage as a foliar spray, ensuring you coat the undersides of the leaves thoroughly.
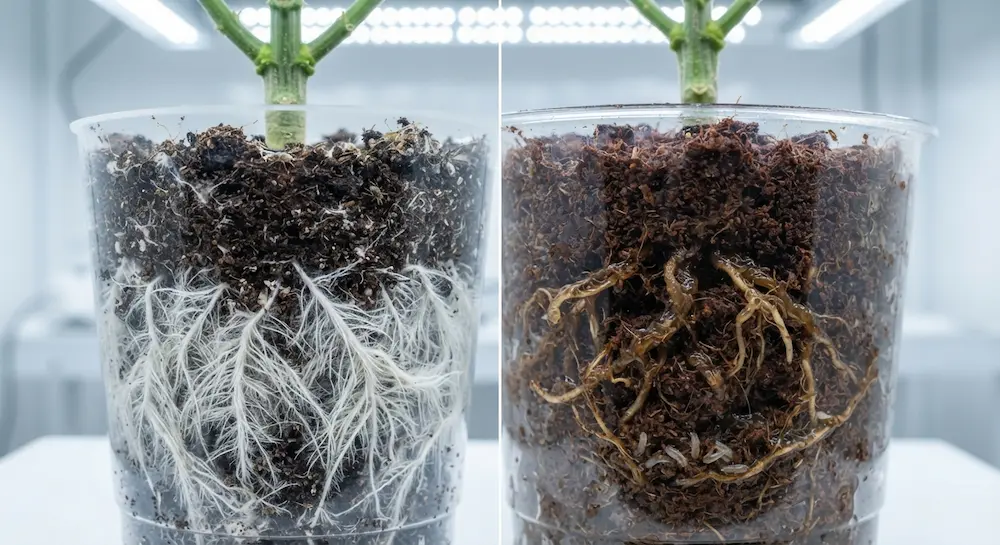
Deep Dive: Managing Root Zone Health and Substrate-Specific Pests
While foliar pests often get the most attention because they are visible on the leaves, subterranean pests operating in the root zone can quietly destroy a crop from the ground up. Managing your substrate—whether you grow in organic living soil, coco coir, or hydro systems—requires distinct strategies.
Soil and Coco Coir Maintenance
Living soils and organic media are biologically active, meaning they naturally host beneficial bacteria and fungi. However, they also retain moisture, making them prime real estate for fungus gnats and root aphids if overwatered.
- Allow Proper Drybacks: Never keep your medium permanently saturated. Allowing the top 1 to 2 inches of soil or coco coir to dry out completely between waterings interrupts the life cycle of fungus gnat larvae, as they require moisture to survive and transition.
- Hydrogen Peroxide Drenches: For an acute root pest flare-up, a mild dilution of food-grade hydrogen peroxide (3%) mixed with water can sterilize the top layer of the root zone, oxidizing organic debris and killing soft-bodied larvae on contact without harming established root systems.
Hydroponic and Soilless Systems
Water-based or sterile media systems eliminate soil-borne bugs like fungus gnats, but they are vulnerable to root rot pathogens and water-borne pests if water temperatures rise above optimal levels. Keep your reservoir temperatures strictly between 18°C and 20°C (65°F to 68°F) to ensure maximum dissolved oxygen, which naturally deters root pathogens and keeps your root mass resilient against pest stress.
Natural and DIY Home-Brewed Preventive Washes
For growers looking to avoid commercial concentrates or commercial pesticide residues entirely during the vegetative stage, simple home-brewed organic sprays can serve as mild, effective deterrents.
- Castor Oil and Horticultural Soap Emulsion: A few drops of pure liquid castor oil combined with organic potassium soap in soft water can act as a gentle deterrent against soil-burrowing pests when used as a root drench.
- Garlic and Chili Pepper Infusion: Pests despise strong, pungent aromas. Steeping crushed garlic cloves and hot chili peppers in water for 24 hours, straining the liquid thoroughly, and spraying it lightly on leaf undersides can repel soft-bodied insects during the early vegetative cycle. Note: Never use capsaicin or garlic sprays once the plant has begun flowering, as it will permanently taint the flavor and aroma of your buds.
- Horticultural Milk Sprays: A diluted mixture of milk and water (typically a 1:9 ratio) sprayed onto foliage can act as a natural antifungal and mild deterrent against surface-level pests due to the amino acids and proteins reacting with sunlight.
Step 5: Post-Harvest Remediation and Room Resets
Even if your active grow cycle ends successfully, your work with cannabis pest control is not complete. Pests have an uncanny ability to survive in dormant life stages (such as eggs tucked into tiny cracks, walls, or ventilation ducting) waiting for the next round of plants.
- The Deep Clean and Total Reset: Once your crop is harvested, trimmed, and hanging to dry, empty the room entirely. Vacuum every square inch of the floor, walls, and ceiling corners.
- Surface Sterilization: Wash all interior surfaces, benches, and trays with a mixture of water and food-grade hydrogen peroxide or specialized horticultural disinfectants. Wipe down your inline fans and replace dirty carbon filter pre-filters.
- The Empty Room Quarantine: If you had a severe pest infestation during your last cycle, leave the room completely empty with no live plants for a minimum of 7 to 10 days after deep cleaning. Any remaining pests that hatched from lingering eggs will starve out without a host plant to feed on.
Building Your Standard Operating Procedure (SOP)
Effective cannabis pest control isn’t something you think about only when bugs appear; it is a weekly routine that must become second nature to any serious cultivator.
- Weekly Scouting Protocol: Set aside 20 minutes every single week to walk your grow space systematically. Take a 30x pocket microscope or jeweler's loupe with you, carefully flipping fan leaves, checking lower branches, and inspecting your yellow and blue sticky cards.
- Preventative Biological Releases: If you have experienced historical pest pressure or operate in a climate prone to outbreaks, consider scheduling a baseline maintenance release of beneficial predatory mites every 3 to 4 weeks as an active biological insurance policy.
- Log Everything Rigorously: Keep a written record or digital log of your room temperatures, daily humidity swings, sticky card insect counts, and any interventions you perform. Tracking these trends over multiple grows helps you spot subtle environmental spikes before they morph into costly, crop-destroying disasters.
By staying disciplined with your environmental controls, rigorously quarantining new genetics, embracing the power of Integrated Pest Management, and executing post-harvest resets, you will protect your hard work, preserve your delicate terpene profiles, and harvest clean, high-yielding cannabis every single time.